We are fairly spoiled here in South Florida with dive boats set up for easy diving. But as we have seen on some of our travels, sometimes we need to do water entries outside of the normal one we do.
The Easy In: Tips for Performing the Giant Stride Entry (GSE)Always evaluate the entry area before gearing up. This is especially important if diving from a boat. Check for any visible hazards. Entry areas vary from boat to boat. Some are as much as six feet above the surface of the water making it necessary to perform a high-platform version of the GSE. You may need assistance from a crewmember, especially if there are no handrails or bars to grasp for balance. A water-level swim platform extending from the stern of a boat is the easiest type of entry area. If you are diving from a stable platform such as a pool deck or dock, check the water level to confirm it is deep enough for a safe entry. If you don’t know the depth, do not enter the water to avoid an injury.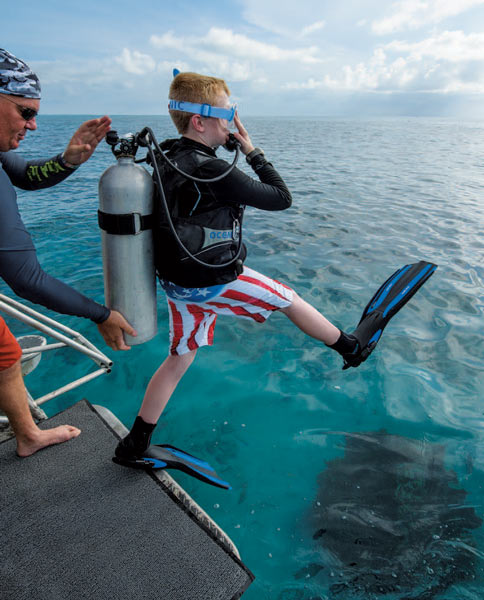
Step One — Approaching the Entry Area
If diving from a boat, you will be given a pre-dive briefing to learn boat procedures and specifics about each dive location. Following the briefing, finish donning your gear and perform a buddy check with your dive partner. Make sure your gear is in place and working properly. Also check the tank to assure the air is turned on. Depending on boat policies and crew instructions, you will either carry or wear your fins to the entry area. When carrying fins, proceed to the entry and don the fins prior to the GSE. If you are asked to wear your fins, slip them on and carefully shuffle heels first or step sideways to the entry point.
After donning the fins, place your mask securely on your face and the regulator in your mouth. Partially inflate your buoyancy compensator (BC). Move to the outer edge of the platform, place the balls of your feet on the outer edge and extend the fin blades over the water. Whether entering the water from a rocking boat platform or a stationary pool deck, position your feet so the fin tips are not below the surface as you begin your giant stride. Once you are properly positioned and ready to make your entry, take one last look into the water close to the entry point to confirm there are no obstructions (such as another diver) in the vicinity. Watch for diver’s bubbles beneath the surface. If you see any bubbles, delay your entry until the area is clear.
Step Two — Securing Your Gear
Once you have ascertained that the entry area is clear, secure your gear by placing the palm of your hand over the second-stage regulator and spread your fingers across the front of the mask. Gently but firmly hold the regulator and mask against your face to prevent them from becoming dislodged on entry. If you are wearing a conventional weight belt, use your free hand to hold the buckle in place. This will prevent the buckle from opening on entry, possibly allowing the loss of the weight belt.
When wearing a weight-integrated BC, use one hand to secure your mask. The other hand can be used to hold gauges close to your body or used to secure the mask strap. The choices you make are determined by your gear configuration and personal preference. Your scuba instructor can help you decide what works best for you.
Step Three — Giant Stride in Action
Now that you have completed Steps 1 and 2, it is time to complete the entry. After a quick look to confirm the area below is clear, place hands in their proper positions, look straight ahead and take a giant step outward from the entry platform. To execute a successful giant stride, it is especially important to look and stride toward the horizon. By doing so, your body will remain vertical, creating the desired entry into the water.
Either leg may be used to stride outward from the platform. Raise the leg high, keeping the fin tip pointing upward to avoid dragging it in the water, which can cause an awkward “face plant” entry. The foot remaining on the platform will pivot on the edge as you are carried away from the boat by the momentum of the giant stride. As you take this giant step away from the boat, enough space will be left for the scuba tank to clear the entry platform.
In rocky seas, proper timing is critical to making a safe GSE. Time the giant stride entry for when the boat pauses at the peak of the platform’s upward movement just prior to the boat’s descent. The split-second timing will prevent you from being thrown off balance by the upward motion of the boat. Instead, you and the boat will both move in a downward motion at the same time.
Step Four — Ready to Dive
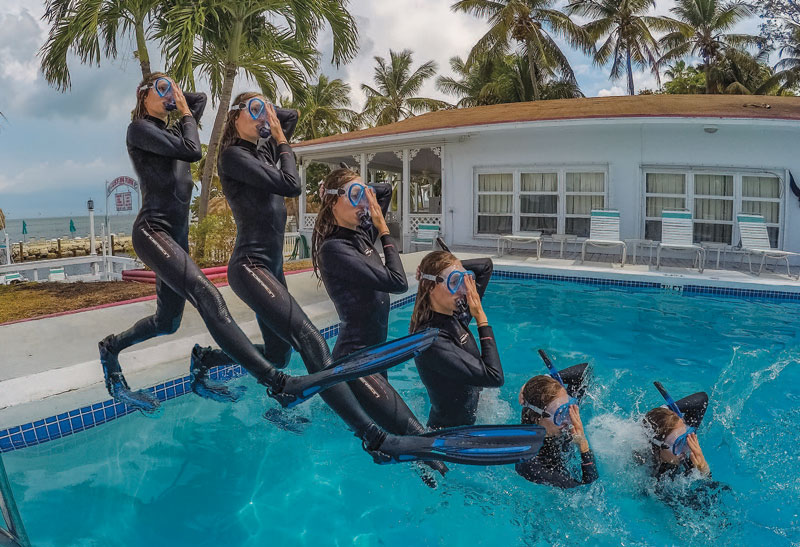
When executing a giant stride correctly, you will enter the water in a vertical position. If striding from a low platform, you can minimize the entry depth by bringing your legs together immediately after contacting the water. This motion will reduce your downward momentum by creating an upward thrust. When making a GSE from a higher platform, this is not appropriate. Instead, immediately after making your giant stride, bring your legs together in a straight line with your torso and make a sleek entry. You will go a little deeper into the water but due to the partial inflation of the BC, you will surface quickly and safely.
After every entry, regardless of where, when or how high, always remember to immediately turn to the boat or shore personnel and give an OK signal by placing your fingertips on the top of your head. If you need assistance, wave your hand(s) back and forth above your head.
“Have a Seat, Please”: The Controlled Seated Entry
The controlled seated entry (CSE) is pretty much as its name implies — it’s a controlled entry done from a seated position. The CSE is typically performed from a platform no higher than 12 to 18 inches (30 to 46 cm) above the surface of the water. Platforms include small boats, swim platforms, pool decks, a dock or the gunwale of an inflatable. The CSE can typically be done in place of the giant stride or backroll entry and allows a slow, gentle entry instead of a big splash.
It is appropriate to use the seated entry when obstacles may be below the surface or when attempting to enter water with a current. Using this type of entry in a current, allows you to hold onto the platform or current line until your group is ready to descend together. By descending together, you are less likely to be separated from your group.
The seated entry is also helpful if you prefer to slip into your scuba unit after entering the water. This technique is very useful for divers with back problems or other issues because the weight of the gear is not placing strain on your back. At the end of the dive, you can remove the scuba unit before exiting the water. Just be sure that your buddy or a crewmember is available to assist with securing the scuba unit after removal.
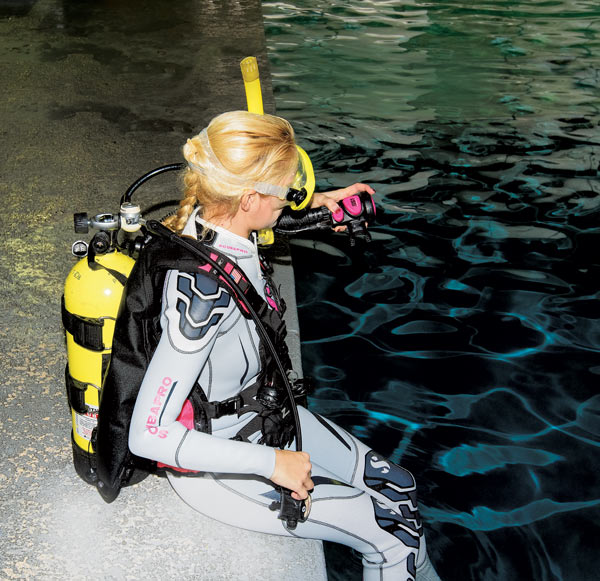
STEP 1
The first step begins by seating yourself on the edge of the entry platform or, in our case, the pool deck. Don your fins and scuba unit. Your buddy or divemaster may need to assist you when donning the scuba unit. After the unit is in place, confirm that the gear is secured properly. Hoses and gauges need to be clipped and stowed to avoid the possibility of getting caught on the platform. Now partially inflate the buoyancy compensator (BC), don your mask and place the regulator or snorkel in your mouth. As you begin the entry, you are seated so that your bottom is near the edge of the platform, your legs are bent at the knees and your lower legs and feet are in the water.
STEP 2
For the CSE to be successful, proper placement of the hands is critical. To begin this step, place the heel of your right hand on the edge of the pool deck, fingers facing the deck and the wrist near your thigh. This hand position may feel awkward at first, but hand placement — with the heel of the hand on the edge of the platform and the fingers pointing away from the water — is important as you initiate Step 3.
For this exercise, the model shown here is entering to the right, but the CSE is performed the same way whether you pivot to the right or the left. You will maneuver your body in the direction of your hands.
STEP 3
The next three steps are broken down for the purpose of explanation but, when you perform the entry, will be executed in one continuous pivoting motion. You begin seated on the pool deck facing the water and finish floating in the water facing the deck. During the entire process, you will remain in control of the entry.
With gear in place and right hand positioned as in Photo 2, move your left arm across your torso while twisting to the right, pivoting on the right hand, transferring your weight onto your arms. The right arm will remain straight (vertical to the pool deck), allowing you to stay close to the edge of the pool.
STEP 4
This step begins as you place your left hand on the pool deck. The left arm will remain vertical to the pool deck with fingers pointing toward the deck. The hands will be shoulder-width apart. You will be leaning slightly forward, facing away from the water. At this point you have the option of stopping the entry process if needed or continuing on to Step 5.
STEP 5
The final step provides a transition from pool deck to water. Done correctly, there will be little or no splash upon entry. With both hands and arms in the position shown in Step 4, slowly lower yourself into the water. Your partially inflated BC will provide the buoyancy needed as you lower into the water. At this point you may wish to add more air to your BC to float comfortably at the surface while you wait for your buddy to enter.
After reviewing the steps for the controlled seated entry, it is easy to understand why many divers prefer this method of entering the water. The prime benefit is that you are in control at all times and feeling in control helps calm pre-dive anxiety or jitters. You also have the option of halting the entry if needed, which cannot be done once you’ve initiated the giant stride or back roll. Both of these methods can create a jarring entry if not done correctly. We suggest you take time to practice the CSE so you can move with confidence from Step 1 to Step 5. This will enable you to start your dive with a gentle, easy entry.
The Modified Controlled Seated Entry
The controlled seated entry described in this column might need to be modified for those with certain mobility issues. If you have particular physical concerns, discuss them with your instructor. Together the two of you can likely come up with a modified seated entry technique that will get you in the water safely and easily.
Enjoy and thanks Dive Training Magazine for the help.
Tom Stenger

